
If you love baking, you know how important the right tools are. A pastry wheel might seem simple, but using it the right way can make all the difference in your baking results.
Imagine cutting perfect dough strips quickly, with clean edges every time. Wouldn’t that save you time and frustration? You’ll discover easy tips to use your pastry wheel efficiently. These tricks will help you work smarter, not harder, and take your baking skills to the next level.
Keep reading to unlock the full potential of your pastry wheel!
Credit: www.surlatable.com
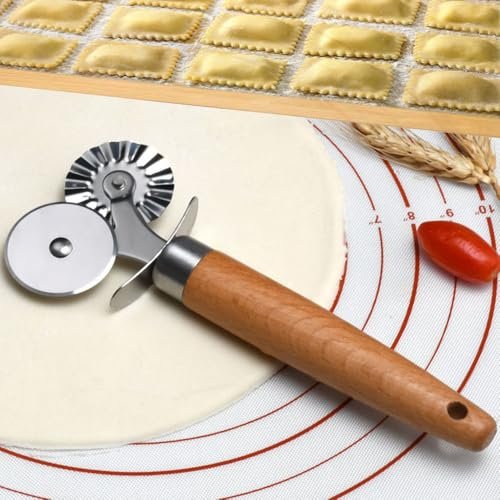
Choosing The Right Pastry Wheel
Using a pastry wheel can make baking easier and more fun. Picking the right one helps you cut dough cleanly and quickly.
There are different pastry wheels for different tasks. Knowing what to choose makes your work better and neater.
Types Of Pastry Wheels
Pastry wheels come in many shapes and styles. Some have straight edges, while others have scalloped edges for decorative cuts.
Choosing the right type depends on the look you want and the dough you use. Straight wheels cut smooth lines. Scalloped wheels add a pretty edge.
- Straight-edge wheel for clean, simple cuts
- Scalloped-edge wheel for decorative edges
- Double-wheel for cutting and sealing pastry
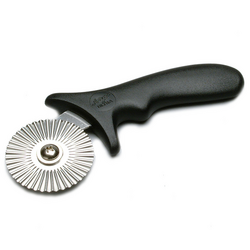
Material Considerations
Pastry wheels are made from different materials. Metal wheels cut well but can rust. Plastic wheels are light but may not last long.
Look for materials that are easy to clean and strong. Stainless steel wheels resist rust and stay sharp. Wooden handles give a good grip.
- Stainless steel for durability and sharp cuts
- Plastic for lightweight and easy cleaning
- Wooden handles for comfort and grip
Size And Design Factors
Size matters when choosing a pastry wheel. Larger wheels cut faster but may be harder to control. Smaller wheels offer precision.
Design features like comfortable handles and easy-rolling wheels help reduce hand strain. Look for wheels that fit your hand well.
- Large wheels for cutting big dough pieces
- Small wheels for detailed work
- Ergonomic handles for comfort
- Smooth rolling for easy cutting
Preparing For Use
Using a pastry wheel correctly starts with good preparation. A clean, sharp tool cuts dough smoothly.
Preparing your pastry wheel helps you make perfect shapes and designs. It also keeps your baking safe.
Proper Cleaning Techniques
Clean your pastry wheel after every use. This stops dough from hardening and sticking to the blade.
Wash it with warm water and mild soap. Use a soft brush to reach small areas around the wheel.
- Do not soak wooden handles in water
- Dry the wheel completely before storing
- Avoid harsh chemicals that can damage the metal
Maintenance Tips
Check your pastry wheel often for damage. Make sure the wheel spins freely and the handle is secure.
Lubricate the wheel’s axle lightly if it feels stiff. Use food-safe oil to keep it moving smoothly.
- Tighten loose screws or bolts
- Replace worn parts to avoid uneven cuts
- Store in a dry place to prevent rust
Ensuring Sharpness
A sharp pastry wheel cuts cleanly without tearing dough. Keep the blade sharp for best results.
Sharpen the wheel using a fine metal file or sharpening stone. Do this carefully to keep the shape.
- Sharpen at a consistent angle
- Test sharpness on a scrap piece of dough
- Sharpen regularly to avoid dull edges
Mastering Basic Techniques
Using a pastry wheel can make baking easier and more fun. It helps cut dough cleanly and add style to pastries.
Learning simple ways to use a pastry wheel improves your baking results. Focus on three key skills to start.
Straight Line Cutting
Hold the pastry wheel firmly and roll it in one smooth motion. Keep your hand steady for straight cuts.
Use a ruler or straight edge to guide the wheel if you want perfect lines. This helps when cutting dough for pies or tarts.
- Place dough on a flat surface
- Align the pastry wheel with a straight edge
- Roll gently and firmly in one direction
- Lift the wheel carefully after the cut
Crimping Edges
Crimping seals the edges of your dough. It keeps fillings inside and gives a neat look.
Press the pastry wheel along the dough edge with light pressure. Move slowly to create small, even ridges.
- Start at one corner of the dough edge
- Roll the wheel gently along the border
- Keep pressure steady for uniform crimps
- Overlap slightly to avoid gaps
Creating Decorative Patterns
Pastry wheels can add fun designs to your dough. Use different rolling speeds and directions for patterns.
Try wavy or zigzag cuts to make pastries look special. Practice on scrap dough before cutting your final piece.
- Roll straight for simple lines
- Roll in curves for waves
- Cross lines for a lattice pattern
- Combine shapes for unique designs

Credit: www.amazon.com
Advanced Tricks For Precision
Using a pastry wheel can help you cut dough with clean edges. Precision improves your pastry’s look and texture.
These tips will help you get the best results with your pastry wheel. Focus on control and consistent cuts.
Using A Guide For Consistency
Use a ruler or straight edge as a guide to keep cuts even. This stops the dough from slipping.
Place the guide on the dough and roll the pastry wheel along it. This creates straight, uniform strips every time.
- Mark the dough lightly before cutting
- Keep the guide steady to avoid wobbles
- Use a non-slip mat under the dough
Layering For Complex Designs
Cut multiple dough layers with your pastry wheel to build detailed patterns. Stack strips for woven or lattice effects.
Press layers gently to keep shape. This adds visual interest and texture to your pastry.
- Create thin strips for delicate layering
- Overlap strips evenly for a neat look
- Use different dough colors for contrast
Combining Wheels For Unique Effects
Try using pastry wheels with different edge styles together. Mix straight, fluted, and scalloped wheels in one design.
This adds variety and makes your pastry more decorative. Plan your cuts before starting to avoid mistakes.
- Use a fluted wheel for borders
- Cut straight strips for filling covers
- Mix scalloped edges for decorative accents
Common Mistakes To Avoid
Using a pastry wheel can make cutting dough easier. But some mistakes can cause problems. Avoid these to work more efficiently.
Knowing what to watch out for saves time and keeps your pastry neat. Here are common errors to avoid with a pastry wheel.
Exerting Too Much Pressure
Pushing too hard with the pastry wheel can tear the dough. It also makes uneven cuts and wastes dough.
Use a light, steady hand instead. Let the wheel roll smoothly to cut through the dough cleanly.
- Press gently to avoid ripping
- Roll the wheel without stopping
- Keep the dough on a flat surface
Neglecting Safety
Pastry wheels have sharp edges. Careless use can cause cuts or injuries. Always handle the tool carefully.
Store the wheel safely when not in use. Keep fingers away from the blade while cutting.
- Hold the handle firmly
- Cut away from your body
- Keep the wheel clean and dry
- Store in a safe place out of reach of children
Ignoring Dough Temperature
Dough that is too warm can stick and stretch when cutting. Cold dough cuts easier and stays in shape.
Keep dough chilled before using the pastry wheel. This helps make neat and clean cuts every time.
- Chill dough for at least 30 minutes
- Work quickly to keep dough cool
- If dough softens, chill again before cutting

Credit: www.honeybyclodagh.com
Enhancing Efficiency In The Kitchen
Using a pastry wheel can save time and improve your baking. It helps cut dough quickly and neatly.
Here are tips to use a pastry wheel efficiently and keep your kitchen organized.
Organizing Your Workspace
Keep your pastry wheel close to your dough and rolling pin. Clear space around your work area.
Organize tools so you can reach them easily without interrupting your work.
- Place the pastry wheel on a clean, flat surface
- Store extra blades in a safe spot nearby
- Keep flour and dough within arm’s reach
- Clear away unused tools to reduce clutter
Streamlining The Process
Cut dough in steady, even motions for clean edges. Use the wheel with gentle pressure.
Work on one section of dough at a time to avoid mistakes and save time.
- Roll out dough evenly before cutting
- Use a ruler or guide for straight cuts
- Clean the wheel between cuts to prevent sticking
- Cut in small sections for better control
Incorporating Other Tools
Use a rolling pin to flatten dough before cutting. A bench scraper helps move dough pieces.
Combine the pastry wheel with cookie cutters or molds for varied shapes.
- Rolling pin ensures even dough thickness
- Bench scraper lifts dough without stretching
- Cookie cutters create uniform shapes
- Molds add decorative edges and designs
Frequently Asked Questions
How Do I Choose The Right Pastry Wheel Size?
Choose a pastry wheel size based on your recipe needs. Smaller wheels are great for intricate designs. Larger wheels cut bigger dough sections quickly. Consider comfort and control when selecting your wheel size.
What Is The Best Technique For Cutting Dough?
Use firm, even pressure while rolling the pastry wheel. Roll in a straight line for clean cuts. Avoid dragging the wheel to prevent dough tearing. Practice steady hand movements for better results.
How Can I Prevent Dough From Sticking To The Wheel?
Lightly dust the pastry wheel with flour before cutting. This reduces sticking and ensures smooth cuts. Clean the wheel between uses to maintain its efficiency. Proper dough temperature also helps reduce sticking.
How Do I Clean And Maintain A Pastry Wheel?
Wash the pastry wheel with warm, soapy water after use. Dry it thoroughly to prevent rusting. Store in a dry place. Regular maintenance ensures sharpness and prolongs the tool’s life.
Conclusion
Using a pastry wheel well makes baking easier and more fun. Take your time cutting dough evenly and carefully. Keep your hand steady for clean, sharp edges. Practice often to improve your speed and skill. Always clean your pastry wheel after use to keep it sharp.
These simple tips help you create beautiful pastries every time. Enjoy the process and share your treats with friends. Baking with a pastry wheel brings joy to any kitchen.