

Your smart kitchen devices make cooking easier and more fun. But have you ever thought about how clean they really are?
Keeping these gadgets spotless isn’t just about looks—it affects their performance and your health. Imagine slicing up veggies with a dirty smart cutting board or brewing coffee with a machine full of grime. Sounds off-putting, right? You’ll discover simple, effective tips to clean your smart kitchen devices safely and quickly.
Stick with me, and your kitchen will stay fresh, your devices will last longer, and your meals will taste better. Ready to get started? Let’s dive in!
Essential Cleaning Supplies
Keeping smart kitchen devices clean helps them work better and last longer. Using the right cleaning supplies makes the job safe and easy.
Choose products that do not harm your devices. Avoid harsh chemicals and rough tools that may cause damage.
Eco-friendly Options
Eco-friendly cleaning supplies are safe for the planet and your devices. They often use natural ingredients and less plastic packaging.
Look for biodegradable soaps, vinegar, and baking soda. These options clean well without harmful chemicals.
- White vinegar for removing stains and odors
- Baking soda as a gentle scrub
- Castile soap for gentle cleaning
- Reusable microfiber cloths to avoid waste
Tools For Delicate Parts
Smart kitchen devices have small, sensitive parts. Use soft tools to avoid damage while cleaning these areas.
Soft brushes and microfiber cloths help clean tight spaces and screens without scratching them.
- Soft-bristle brush for vents and buttons
- Microfiber cloth for screens and surfaces
- Cotton swabs for small crevices
- Compressed air to blow out dust

Credit: www.youtube.com
Cleaning Smart Ovens
Smart ovens have touchscreens and sensors that need careful cleaning. Dirt and grease can affect their performance.
Cleaning smart ovens regularly helps keep them working well and looking nice.
Handling Touchscreens
Touchscreens on smart ovens are sensitive. Use a soft cloth to avoid scratches.
Do not spray cleaner directly on the screen. Spray on the cloth first, then wipe gently.
- Use microfiber cloths only
- Avoid harsh chemicals or abrasive materials
- Turn off the oven before cleaning the screen
- Clean regularly to prevent buildup
Dealing With Grease Buildup
Grease can build up inside and outside the oven. It can cause bad smells and affect cooking.
Use warm soapy water to clean greasy spots. Avoid using too much water near electronics.
- Remove racks and clean separately
- Use a soft sponge for greasy areas
- Dry all parts well before reassembling
- Clean spills quickly to stop buildup
Maintaining Smart Refrigerators
Smart refrigerators have many features that keep food fresh and organized. Proper cleaning keeps these features working well.
Regular maintenance helps avoid problems and makes your fridge last longer. Clean all parts carefully and often.
Cleaning Water And Ice Dispensers
Water and ice dispensers can build up dirt and bacteria. Clean them to keep water and ice fresh and safe.
Use a soft cloth and mild soap to wipe the dispenser parts. Avoid harsh chemicals that can damage the system.
- Turn off the dispenser before cleaning
- Remove dispenser trays and wash them in warm, soapy water
- Use a small brush to clean tight spots
- Rinse all parts thoroughly before putting them back
- Run water through the dispenser to flush out residue
Managing Odors
Smart refrigerators can develop odors from spoiled food or spills. Regular cleaning helps keep the fridge smelling fresh.
Check and clean the fridge interior often. Use baking soda or activated charcoal to absorb bad smells.
- Remove all food and clean shelves with warm, soapy water
- Wipe door seals and corners where dirt collects
- Place an open box of baking soda inside to absorb odors
- Change the baking soda every three months for best results
- Keep food sealed to prevent smells from spreading
Caring For Smart Dishwashers
Smart dishwashers make cleaning dishes easy. Taking care of them keeps them working well.
Regular cleaning helps avoid problems and extends the dishwasher’s life. Focus on key parts.
Removing Limescale
Limescale builds up from hard water. It can block water flow and damage the machine.
Use a dishwasher-safe limescale remover to clean inside parts. Run a cleaning cycle monthly.
- Empty the dishwasher before cleaning
- Place the limescale remover in the detergent area
- Run the hottest cycle available
- Wipe the door seals with a damp cloth
Sanitizing Filters
Filters catch food and debris. Dirty filters cause bad smells and reduce cleaning power.
Remove and rinse filters under warm water. Use a soft brush to clear stuck particles.
- Turn off the dishwasher before removing filters
- Take out the filter carefully
- Rinse filters with warm water
- Brush gently to remove residue
- Replace filters securely before use
Preserving Smart Coffee Makers
Smart coffee makers need regular cleaning to work well. Keeping them clean helps the machine last longer.
Simple care steps prevent problems and keep your coffee tasting fresh every day.
Descaling Processes
Descaling removes mineral buildup inside the coffee maker. This buildup can block water flow and affect taste.
Use a descaling solution or vinegar to clean the inside parts. Run the machine with this solution and then with clean water.
- Fill the water tank with descaling solution or vinegar mix
- Run a brew cycle without coffee grounds
- Repeat with fresh water to rinse
- Wipe outside parts with a damp cloth
Cleaning Brew Baskets
Brew baskets hold coffee grounds and need regular cleaning. Old grounds can cause bad smells and taste.
Remove the basket and wash it with warm soapy water. Dry it well before placing it back.
- Take out the brew basket carefully
- Wash with mild soap and warm water
- Use a brush to remove stuck grounds
- Rinse and dry completely
- Put the basket back into the machine
Tidying Smart Cooktops
Smart cooktops are a great addition to modern kitchens. They cook food efficiently and look sleek.
Keeping them clean helps maintain their performance and appearance. Use gentle methods to avoid damage.
Stain Removal Techniques
Remove stains quickly to prevent them from setting on the cooktop. Use soft cloths and mild cleaners.
Avoid harsh scrubbing tools that can scratch the surface. For tough stains, try natural solutions first.
- Wipe spills immediately with a damp cloth
- Use a mixture of baking soda and water for stains
- Apply white vinegar to break down grease
- Gently scrub with a soft sponge or cloth
- Dry the surface with a clean towel
Protecting Induction Surfaces
Induction cooktops have delicate glass surfaces. Protect them from scratches and heat damage.
Use cookware with smooth bottoms and avoid dragging pots across the surface. Regular cleaning keeps the surface safe.
- Lift pots instead of sliding them
- Use cookware made for induction cooktops
- Clean with soft, non-abrasive cloths
- Avoid spills of sugar or salt that can burn
- Turn off the cooktop before cleaning
Polishing Smart Microwaves
Smart microwaves need regular cleaning to work well. Polishing them keeps the surface shiny and neat.
Use gentle cleaning methods to avoid damage to smart features. Keep your microwave looking new and fresh.
Deodorizing Interior
Microwave odors come from food spills and steam. Remove smells by using natural deodorizing methods.
Heat a bowl of water with lemon slices or vinegar inside the microwave. Let it steam for five minutes to freshen the air.
- Place a bowl of water with lemon slices inside
- Heat on high for 5 minutes
- Wipe interior with a soft cloth after steaming
- Repeat if odors remain
Cleaning Vents And Grilles
Vents and grilles collect dust and grease. Clean them often to keep airflow smooth and parts cool.
Use a soft brush or vacuum cleaner to remove dust. Wipe grills with a damp cloth to clear grease.
- Unplug the microwave before cleaning vents
- Brush dust off vents gently
- Vacuum vents to remove stubborn dirt
- Wipe grills with a damp cloth and mild soap
- Dry completely before plugging in
Credit: www.tasteofhome.com
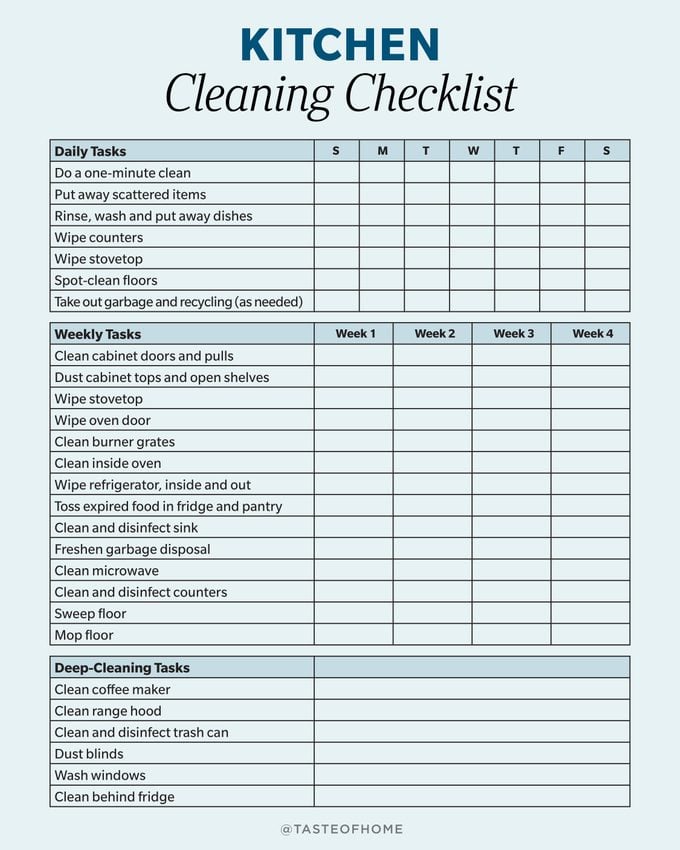
Smart Device Cleaning Frequency
Keeping smart kitchen devices clean helps them work well and last longer. Dirt and grime can slow down or damage these gadgets.
Cleaning frequency depends on the type of device and how often you use it. Regular care prevents buildup and keeps everything safe.
Weekly Routines
Clean smart kitchen devices weekly to avoid dust and food residue. This routine keeps sensors and surfaces clear.
Wipe screens and buttons with a soft cloth. Use gentle cleaners that do not harm electronics.
- Use a microfiber cloth for screens
- Remove crumbs from trays and slots
- Check for fingerprints or smudges
- Dry devices fully before use
Monthly Deep Cleaning
Do a deep clean once a month to reach hidden parts. This helps avoid buildup in vents and small openings.
Unplug devices before cleaning. Use small brushes or compressed air to clean tight spots safely.
- Remove detachable parts and wash them
- Clean ventilation areas with a soft brush
- Sanitize surfaces with alcohol wipes
- Inspect cables and connections for dirt
Safety Precautions
Cleaning smart kitchen devices needs care to keep you safe. These devices have electrical parts that can get damaged if not handled right.
Follow simple rules to avoid accidents and keep your devices working well for a long time.
Handling Electrical Components
Always unplug smart kitchen devices before cleaning. This stops electric shocks and damage.
Do not use water or wet cloth near plugs and buttons. Use a dry or slightly damp cloth instead.
- Unplug device before cleaning
- Keep water away from electrical parts
- Use soft, dry cloth on buttons and plugs
- Do not spray water directly on device
Avoiding Damage
Use gentle cleaning tools to avoid scratches. Harsh brushes or chemicals can harm the device.
Follow the manufacturer’s instructions for cleaning. This helps prevent voiding warranty or breaking parts.
- Use soft cloths or sponges
- Avoid strong chemicals or abrasive cleaners
- Check cleaning guide in the manual
- Do not soak devices in water

Credit: www.youtube.com
Frequently Asked Questions
How Often Should I Clean Smart Kitchen Devices?
Clean smart kitchen devices weekly to prevent dirt buildup. Regular cleaning ensures optimal performance and hygiene. Use soft, damp cloths and avoid harsh chemicals to protect sensors and screens.
What Cleaning Materials Are Safe For Smart Kitchen Gadgets?
Use microfiber cloths, mild soap, and water for cleaning. Avoid abrasive cleaners and solvents that can damage device surfaces. Always unplug devices before cleaning to ensure safety.
Can Moisture Damage Smart Kitchen Appliances?
Yes, excessive moisture can harm smart devices. Avoid soaking or spraying water directly on electronics. Use a damp cloth for cleaning and dry devices thoroughly afterward.
How To Clean Touchscreens On Smart Kitchen Devices?
Gently wipe touchscreens with a microfiber cloth. Use a screen-safe cleaner or a mix of water and isopropyl alcohol. Avoid pressing too hard to prevent damage.
Conclusion
Keeping smart kitchen devices clean helps them work well longer. Regular care stops dirt and germs from building up. Use soft cloths and gentle cleaners for best results. Avoid water inside the devices to prevent damage. Small efforts make a big difference in device performance.
Clean devices also keep your kitchen healthy and fresh. Follow these tips to enjoy your smart kitchen every day. Simple steps keep your gadgets ready for cooking and fun.