
Are your kitchen cabinets a mess of hard-to-reach items and wasted space? You’re not alone.
Setting up Lazy Susans in your cabinets can transform your cluttered shelves into organized, easy-to-access storage. Imagine grabbing what you need with just a simple spin, saving time and frustration every day. In this guide, you’ll learn exactly how to install Lazy Susans quickly and effortlessly, turning your cabinets into a neat, functional space you’ll love.
Ready to make your kitchen smarter and more convenient? Let’s get started!

Credit: www.pakitchen.com
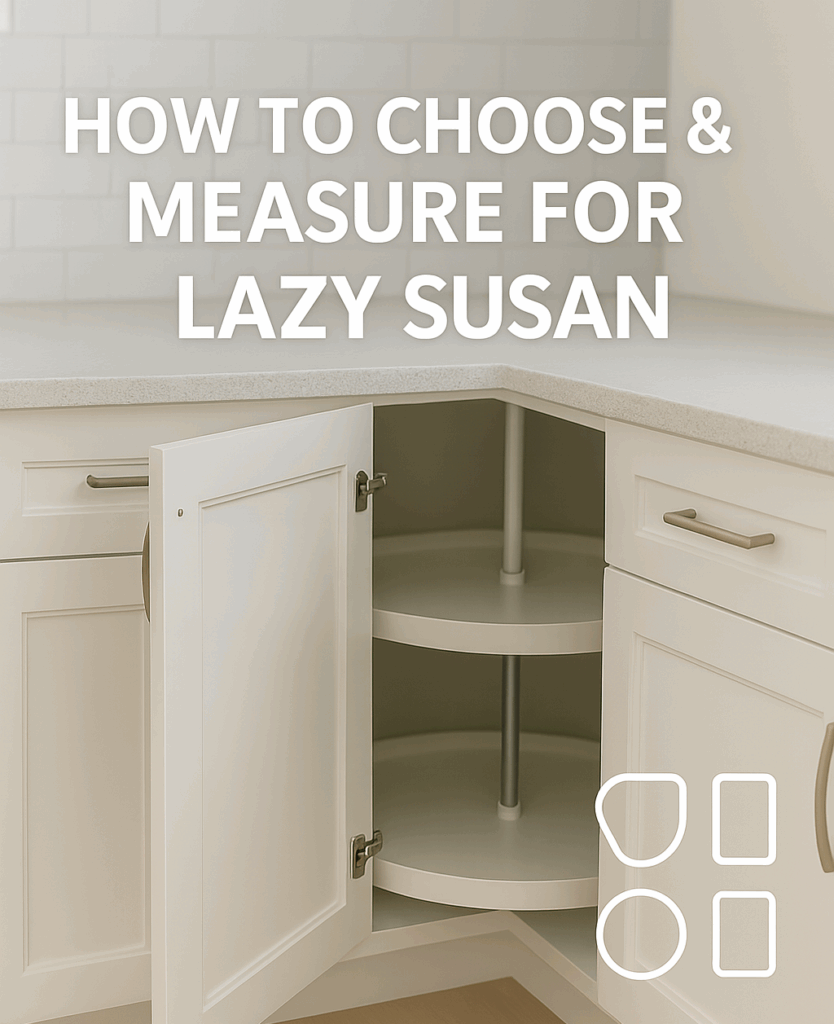
Choosing The Right Lazy Susan
Setting up a Lazy Susan in your cabinet can save space and make items easier to reach. Selecting the right Lazy Susan is important for efficient storage.
Consider the types, size, shape, and materials available to find the best fit for your needs.
Types Of Lazy Susans
Lazy Susans come in different types to suit various cabinet layouts. Some rotate fully, while others have limited movement.
- Full-Circle: Spins 360 degrees, perfect for round cabinets.
- Half-Moon: Fits in L-shaped cabinets, rotates out for easy access.
- Kidney-Shaped: Ideal for corner cabinets with angled doors.
Size And Shape Considerations
Measure your cabinet space before choosing a Lazy Susan. The size and shape should match your cabinet’s dimensions.
Ensure there is enough room for the Lazy Susan to spin without hitting cabinet walls or doors.
- Measure the cabinet’s diameter and depth.
- Choose a shape that fits the cabinet’s interior.
- Ensure clearance for rotation.
Material Options
Lazy Susans are available in various materials. Each material has its own benefits and considerations.
Choose a material that matches your kitchen’s style and is easy to clean.
- Plastic: Lightweight and affordable.
- Wood: Sturdy and natural-looking.
- Metal: Durable and modern.
Preparing Your Cabinet
Setting up Lazy Susans in your cabinets makes your space more organized. Proper preparation helps the installation go smoothly.
Start by checking your cabinet carefully. This helps you know what to do next.
Measuring Cabinet Dimensions
Measure the width, depth, and height of your cabinet inside. These numbers tell you what size Lazy Susan will fit.
Use a tape measure and write down the results. Measure twice to be sure.
- Measure width from side to side
- Measure depth from front to back
- Measure height from bottom to top
Clearing Out The Space
Take everything out of the cabinet before you install the Lazy Susan. This makes the work easier and safer.
Clean the inside of the cabinet well. Remove dust and crumbs to help the parts fit better.
- Empty all items from the cabinet
- Wipe down all surfaces inside
- Check for sticky spots or stains
Checking For Obstructions
Look inside and under the cabinet for pipes, wires, or screws. These can block Lazy Susan installation.
Make sure the cabinet bottom is flat and strong. Any bumps or weak spots can cause problems.
- Find pipes or wires inside the cabinet
- Check the cabinet floor for flatness
- Note any nails, screws, or brackets
Tools And Supplies Needed
Setting up Lazy Susans in cabinets makes it easier to reach items. You need some basic tools and supplies to install them correctly.
Gathering the right tools helps the project go smoothly. It also keeps you safe while working inside cabinets.
Basic Tools List
You need several tools to measure, cut, and fix Lazy Susans in place. Having these ready saves time and effort.
- Measuring tape to get exact cabinet dimensions
- Pencil for marking spots
- Power drill with drill bits for making holes
- Screwdriver to secure screws
- Level to keep the Lazy Susan even
- Jigsaw or handsaw if cutting is needed
- Clamps to hold pieces steady
Safety Equipment
Safety is important when working with tools. Wearing the right equipment protects you from injuries.
- Safety glasses to protect your eyes from dust and debris
- Work gloves to shield your hands
- Dust mask to avoid breathing sawdust
- Ear protection if using loud power tools
Step-by-step Installation
Installing a lazy Susan in your cabinet makes it easier to reach items. Follow these steps to set it up correctly.
Take your time with each step to ensure the lazy Susan works smoothly and fits well.
Marking The Mounting Location
Open your cabinet and clear the space where the lazy Susan will go. Find the center of the cabinet floor.
Use a pencil to mark the exact spot for the base. This mark shows where you will attach the lazy Susan.
- Measure the cabinet width and depth
- Find the center point on the cabinet floor
- Mark the center with a pencil
Attaching The Lazy Susan Base
Place the lazy Susan base on the mark you made. Make sure it sits flat and lines up well.
Use screws and a drill to attach the base firmly to the cabinet floor. Do not overtighten the screws.
- Position the base on the center mark
- Use a drill to screw it in place
- Check that the base is stable and flat
Securing The Turntable
Place the turntable on the base. Align the holes on the turntable with the base holes.
Screw the turntable onto the base. Ensure all screws are tight but do not force them.
- Align turntable holes with base holes
- Insert screws and tighten gently
- Check for even attachment all around
Testing The Rotation
Spin the lazy Susan gently to test its rotation. It should turn smoothly without wobbling.
If it feels tight or loose, adjust the screws or reposition the base as needed for better balance.
- Spin the lazy Susan by hand
- Check for smooth, quiet rotation
- Tighten or loosen screws to fix wobble
Organizing Items On The Lazy Susan
Lazy Susans help keep cabinet items easy to find and reach. Organizing items well makes your kitchen neater.
Good organization lets you use space smartly and keeps everything accessible. Here are tips to organize your Lazy Susan.
Grouping Similar Items
Put items that are alike together on the Lazy Susan. This keeps things tidy and easy to spot.
Group spices, baking supplies, or canned goods in separate sections. It makes cooking faster and easier.
- Keep baking powders and spices in one area
- Store canned vegetables and soups together
- Place oils and vinegars in one spot
Maximizing Space Efficiency
Use every inch of the Lazy Susan by stacking or using small containers. This saves space and keeps items stable.
Choose containers that fit the items well. Avoid overcrowding to prevent spills and make turning easier.
- Use short containers for spices or jars
- Stack small baskets for snacks or packets
- Place heavier items near the center for balance
Maintaining Accessibility
Put frequently used items at the front or on top. This way, you do not have to move many things to get what you need.
Keep labels facing outward and avoid clutter. This helps you find things quickly and keeps the Lazy Susan easy to spin.
- Place daily use items where they are easy to reach
- Label containers clearly for quick identification
- Leave space to spin the Lazy Susan without obstruction

Credit: ca.style.yahoo.com
Maintenance Tips
Lazy Susans help you use cabinet space well. Keeping them clean and working smoothly saves time.
Simple care steps keep your Lazy Susan spinning freely. Regular checks stop problems early.
Cleaning The Lazy Susan
Clean your Lazy Susan often to stop dirt buildup. Remove items before cleaning for easy access.
Use a soft cloth with mild soap and water. Avoid harsh cleaners that can damage the surface.
- Wipe shelves and edges gently
- Dry all parts before putting items back
- Check for crumbs or spills in corners
Lubricating Moving Parts
Lubricate the Lazy Susan’s moving parts to keep them turning smoothly. Use a light oil or silicone spray.
Apply lubricant on the center bearing and tracks. Wipe away extra oil to prevent dust buildup.
- Use lubricant every few months
- Do not over-apply oil
- Choose non-sticky lubricants
Troubleshooting Common Issues
If the Lazy Susan sticks or wobbles, check for loose screws or debris. Tighten any loose parts carefully.
Noise or rough spinning often means dirt or lack of lubrication. Clean and oil the parts as needed.
- Remove and clean if items block movement
- Check for worn or damaged parts
- Replace parts if spinning does not improve

Credit: orgjunkie.com
Frequently Asked Questions
What Tools Are Needed To Install A Lazy Susan?
You need a drill, screws, measuring tape, pencil, and a level for installation. These tools help secure the Lazy Susan properly inside the cabinet.
How To Measure Cabinet Space For Lazy Susan Installation?
Measure the cabinet’s width and depth accurately. This ensures the Lazy Susan fits perfectly and rotates without obstruction.
Can Lazy Susans Fit In Corner Cabinets?
Yes, Lazy Susans are ideal for corner cabinets. They maximize storage by making items easily accessible in hard-to-reach corners.
How To Secure A Lazy Susan Inside A Cabinet?
Attach the Lazy Susan base firmly using screws and a drill. Ensure it is level to allow smooth rotation.
Conclusion
Setting up lazy Susans in your cabinets makes storage simple and neat. You can find things quickly without moving other items. The process is easy and saves time in the kitchen. Just follow the steps carefully and choose the right size.
Your cabinets will look better and work smarter. Enjoy the extra space and easy access every day. Give your kitchen a small upgrade with this handy tool. You will notice the difference right away.