
Your under-sink area can easily turn into a cluttered mess, making it hard to find what you need when you need it. But what if your under-sink storage was neat, organized, and truly useful?
Imagine opening that cabinet and instantly spotting everything in its place. You’ll save time, reduce stress, and even extend the life of your cleaning supplies. You’ll discover simple, practical tips to maintain your under-sink storage like a pro. Keep reading to transform that overlooked space into an organized haven you’ll actually enjoy using.
Assess Your Space
Keeping your under-sink storage organized starts with a good look at the space. You need to know what you have before you can make it better.
Check the size and shape of the area. Notice any spots that cause problems or waste space.
Measure Dimensions
Use a tape measure to get the width, depth, and height of the cabinet. Write down these numbers for planning storage.
Measure inside the cabinet, not just the outside. This helps to see exactly how much room you have.
- Measure the width from left to right
- Measure the depth from front to back
- Measure the height from bottom to top
- Note any pipes or obstacles inside
Identify Problem Areas
Look for spots that make storage hard. Pipes or uneven surfaces may block space or cause leaks.
Check for dampness, mold, or bad smells. These can damage stored items and need fixing.
- Pipes that take up too much space
- Leaks or water damage
- Hard-to-reach corners
- Uneven or damaged shelves

Credit: www.familyhandyman.com
Declutter Regularly
Keeping your under-sink storage neat helps you find items fast. Regular decluttering stops clutter from building up.
Set a schedule to check your under-sink area. This makes cleaning easier and keeps the space organized.
Sort Items By Use
Group your items based on how often you use them. Keep daily items at the front for easy reach.
- Place cleaning sprays and sponges where you can grab them quickly.
- Store rarely used items like extra soap or backup sponges in the back.
- Use bins or small containers to keep similar items together.
- Label containers to make finding things simple.
Dispose Of Expired Products
Check all products under the sink for expiration dates. Expired items can be unsafe or ineffective.
| Product Type | Check Expiry | Safe Disposal |
| Cleaning sprays | Every 12 months | Follow local hazardous waste rules |
| Sponges and scrubbers | Every 3 months | Throw in trash if worn out |
| Drain cleaners | Every 6 months | Do not pour in drains if expired |
Choose The Right Containers
Good containers help keep your under-sink area clean and neat. They protect items from moisture and dirt.
Select containers that fit your space and needs. This makes finding items quick and easy.
Use Clear Bins
Clear bins let you see inside without opening them. This saves time when looking for items.
They also help you spot when supplies are running low. Clear containers keep everything visible and tidy.
- Find items faster
- Check supplies at a glance
- Keep contents dust-free
- Stack easily if needed
Opt For Stackable Solutions
Stackable containers use vertical space well. You can store more without cluttering the area.
Choose bins that lock or fit securely when stacked. This keeps your storage safe and stable.
- Maximize storage space
- Keep items organized by category
- Prevent containers from falling
- Make cleaning easier
Maximize Vertical Space
Under-sink storage often gets cluttered and hard to use. Using vertical space helps keep things neat.
Stacking items and adding height makes the most of the limited area under your sink.
Install Shelves
Adding shelves creates extra layers inside your cabinet. This lets you store more items upright.
You can use adjustable or fixed shelves depending on what fits your space best.
- Measure the height and width of your cabinet.
- Choose shelf materials that resist moisture.
- Install shelves at different heights for tall and short items.
- Use shelf liners to protect surfaces.
Hang Door Organizers
Door organizers use the inside of cabinet doors for extra storage. They keep small items easy to reach.
These organizers come in many styles like pockets, racks, and hooks to hold cleaning supplies or tools.
- Choose organizers that fit your door size.
- Place frequently used items in the door pockets.
- Use hooks for hanging brushes or gloves.
- Keep heavier items on shelves, not doors.
Create Zones For Items
Organizing your under-sink storage helps you find things quickly. Creating zones for different items makes the space neat and safe.
Clear zones keep cleaning supplies and tools separate. This stops clutter and protects your items from damage.
Separate Cleaning Supplies
Keep all cleaning products in one area under the sink. Group sprays, liquids, and powders separately to avoid spills and confusion.
- Place bottles with spray nozzles together
- Store liquids upright to prevent leaks
- Use bins to hold powders and wipes
- Label each container for easy identification
Designate Tool Areas
Tools like brushes, gloves, and sponges need their own space. This keeps them dry and ready to use.
| Tool | Storage Tip |
|---|---|
| Brushes | Hang on hooks inside the cabinet door |
| Gloves | Keep in a small basket or box |
| Sponges | Store in a ventilated holder to dry |
| Scrubbers | Place in a clear container for easy access |
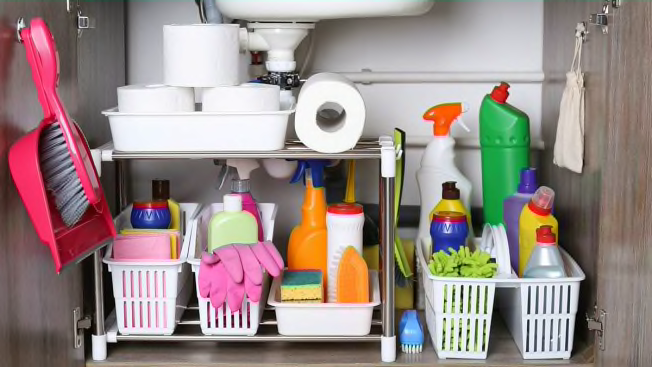
Credit: www.consumerreports.org
Maintain Airflow And Cleanliness
Keeping your under-sink storage clean and well-ventilated helps prevent mold and odors. Good airflow reduces moisture buildup and keeps items fresh.
Regular care maintains the space’s usability and protects stored items from damage caused by dampness or dirt.
Use Moisture Absorbers
Moisture absorbers help control humidity under the sink. They reduce dampness that causes mold and bad smells.
- Place silica gel packs or activated charcoal bags in the cabinet.
- Replace absorbers every few months to keep them effective.
- Choose natural options like baking soda for a safe and cheap solution.
- Ensure absorbers do not touch cleaning products or spills.
Wipe Down Regularly
Cleaning the cabinet prevents dirt and grime buildup. It also stops mold from growing on surfaces.
| Cleaning Task | Frequency |
| Wipe shelves and walls with a damp cloth | Weekly |
| Remove and clean all items | Monthly |
| Check for leaks or spills | Weekly |
| Dry the cabinet thoroughly after cleaning | Every time |
Incorporate Easy Access Features
Under-sink storage can get messy and hard to reach. Adding easy access features helps you find items quickly.
Organizing with simple tools makes your space more useful and less cluttered.
Label Containers
Labeling containers helps you see what is inside without opening them. Use clear and readable labels for best results.
Labels save time and keep everything in its place. Use waterproof labels for areas that might get wet.
- Use large print labels for easy reading
- Label containers by category, like cleaning or tools
- Place labels on container tops and sides
- Replace worn or faded labels regularly
Use Pull-out Drawers
Pull-out drawers let you reach items at the back easily. You do not have to move everything to find what you need.
Drawers keep items organized and visible. They work well for small bottles and cleaning supplies.
- Choose drawers that fit your cabinet size
- Install smooth sliding tracks for easy use
- Use drawer dividers to separate items
- Keep frequently used items in top drawers
Establish A Maintenance Routine
Keeping your under-sink storage tidy helps prevent damage and clutter. A regular routine makes this task easy and quick.
Set clear times to check and clean your storage. This keeps everything in order and extends the life of your items.
Weekly Quick Checks
Spend a few minutes each week to inspect your under-sink area. Look for leaks, spills, or any signs of mold.
Remove any trash or expired products. Make sure everything is in its place and easy to reach.
- Check for water leaks under the sink
- Wipe up small spills immediately
- Throw away empty or expired containers
- Organize items to keep them accessible
Monthly Deep Clean
Take time once a month to clean everything deeply. Remove all items and clean the shelves and walls.
Check for damage to pipes or storage containers. Dry the area well before putting items back.
- Empty the entire under-sink cabinet
- Clean shelves and walls with mild cleaner
- Inspect pipes for leaks or rust
- Let the area dry completely
- Replace or fix damaged items
- Return items neatly and organized

Credit: prettyhandygirl.com
Frequently Asked Questions
How Do I Organize Under-sink Storage Effectively?
Start by removing everything and sorting items by use. Use clear bins and labels to group similar products. Install shelves or pull-out drawers to maximize space. Keep frequently used items accessible and discard expired products regularly.
What Are The Best Containers For Under-sink Storage?
Opt for stackable plastic bins, clear baskets, or airtight containers. These protect items from moisture and make it easy to find supplies. Choose sizes that fit your cabinet dimensions to maximize space and reduce clutter.
How Can I Prevent Mold Under The Sink?
Ensure good ventilation by leaving the cabinet door open occasionally. Use moisture-absorbing products like silica gel or baking soda. Regularly check for leaks and clean spills immediately to keep the area dry and mold-free.
How Often Should I Clean Under-sink Storage?
Clean and declutter your under-sink area every 3 to 6 months. Regular cleaning prevents buildup of dirt, mold, and expired products. It also helps maintain organization and prolongs the life of stored items.
Conclusion
Maintaining under-sink storage keeps your space neat and organized. Regularly check for leaks. Clean and declutter items you don’t need. Use bins and racks for better space use. Keep cleaning supplies within easy reach. Label items for quick access. Store heavier items on the bottom.
Remember to wipe surfaces often. A tidy under-sink area saves time and stress. Implement these tips for a more efficient space. Enjoy a clutter-free and organized home. Simple steps make a big difference. Happy organizing!