
Is your range hood covered in stubborn grease that just won’t come off? You’re not alone.
Grease buildup can make your kitchen look dirty and even affect how well your hood works. But don’t worry—cleaning it doesn’t have to be a tough, time-consuming chore. You’ll discover simple, effective ways to get rid of grease quickly and keep your range hood sparkling clean.
Ready to make your kitchen fresher and healthier? Let’s dive in and tackle that grease together!
Preparation Steps
Cleaning grease from your range hood keeps your kitchen fresh and safe. Proper preparation makes the job easier and more effective.
Before you start, gather the right supplies and take safety measures. This helps prevent damage and injury.
Gather Necessary Supplies
Collect all cleaning tools and products before you begin. This saves time and avoids interruptions.
- Dish soap or degreaser
- Warm water
- Soft cloths or sponges
- Old toothbrush or small brush
- Bucket or large bowl
- Rubber gloves
- Step stool or ladder (if needed)
- Plastic scraper (optional)
Ensure Safety Precautions
Safety is important when cleaning greasy surfaces. Take steps to protect yourself and your kitchen.
- Turn off the range hood and stove
- Unplug the range hood if possible
- Wear rubber gloves to protect your hands
- Use a step stool carefully to reach high areas
- Avoid harsh chemicals that can harm skin or surfaces
- Ventilate the kitchen by opening windows
Removing Filters
Cleaning grease from your range hood starts with removing the filters. Filters trap grease and dirt during cooking. Removing them carefully helps you clean better and keep your hood working well.
This guide shows how to take out filters safely. Follow these steps to avoid damage and clean your filters properly.
Unlatch And Remove Filters
Look for the latch or clip holding the filters in place. Most filters have a simple mechanism to unlock them. Press or slide the latch to release the filter.
Hold the filter firmly as you remove it. Some filters can be heavy or greasy, so be careful not to drop or damage them.
- Find the latch or clip on the filter frame
- Press, slide, or pull the latch to unlock
- Carefully pull the filter out of the hood
- Place the filter on a flat surface for cleaning
Check For Reusable Or Disposable Filters
Filters come in two main types: reusable and disposable. Reusable filters can be cleaned and used again. Disposable filters need replacement after use.
Look for labels or instructions on the filter. If unsure, check your range hood manual. Knowing your filter type helps you decide the right cleaning or replacement method.
- Reusable filters:Made of metal or mesh, clean with warm soapy water
- Disposable filters:Usually paper or fiber, replace with new ones
- Check the filter’s condition before reinstalling
Cleaning The Filters
Cleaning the filters in your range hood keeps it working well. Grease and dirt build up over time and can block air flow.
Regular cleaning stops bad smells and keeps your kitchen fresh. You only need a few simple tools and ingredients.
Soaking In Hot Soapy Water
Fill a basin or sink with hot water and add dish soap. Let the filters soak for 10 to 15 minutes. This loosens the grease and dirt.
- Remove the filters from the range hood carefully.
- Place them in the hot soapy water.
- Soak for 10 to 15 minutes.
- Use a soft brush to scrub off loose grease.
Using Baking Soda For Stubborn Grease
Stubborn grease needs a stronger cleaner. Baking soda is gentle and effective. It breaks down tough grease without harsh chemicals.
Try this baking soda paste:
| Ingredient | Amount |
|---|---|
| Baking Soda | 1/4 cup |
| Water | 2 tablespoons |
Mix baking soda and water to make a paste. Apply to greasy spots. Let sit 10 minutes. Scrub gently with a brush.
Rinsing And Drying
After cleaning, rinse the filters well to remove soap and baking soda. Dry them completely to stop rust and smells.
- Rinse filters under warm running water.
- Shake off excess water.
- Dry with a clean towel or let air dry.
- Put filters back into the range hood only when dry.
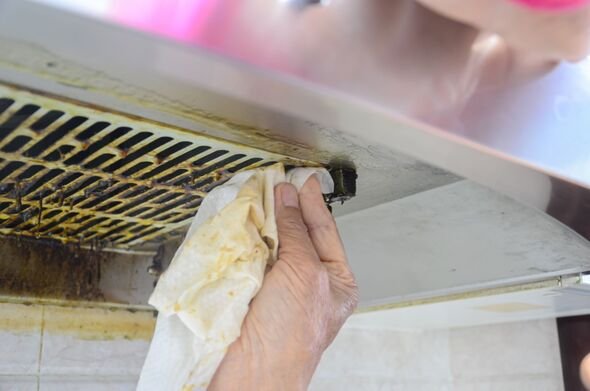
Cleaning The Hood Surface
Cleaning the range hood surface keeps your kitchen fresh and safe. Grease can build up fast on the hood.
Regular cleaning stops grease from hardening and damaging the surface. Use the right tools and cleaners.
Choosing The Right Cleaner
Select a cleaner made for kitchen grease. Avoid harsh chemicals that can harm the hood’s finish.
Look for mild degreasers or natural options like vinegar mixed with water. Test cleaner on a small spot first.
- Use a mild dish soap solution for light grease
- Try vinegar and water for natural cleaning
- Avoid bleach or abrasive cleaners
Wiping Down With A Soft Cloth
Use a soft cloth to wipe the hood surface gently. Avoid rough sponges that can scratch the finish.
Dip the cloth in the cleaner, wring out extra liquid, and wipe in circular motions for best results.
- Choose microfiber or cotton cloths
- Change cloth if very dirty to avoid spreading grease
- Dry the surface with a clean cloth after wiping
Focus On Grease-prone Areas
Grease gathers more around buttons, edges, and vents on the hood. Clean these spots carefully.
Use a small brush or cotton swab to reach tight spaces. Regular attention stops grease buildup in these areas.
- Clean around control buttons often
- Wipe edges and corners thoroughly
- Remove and clean vent covers if possible
Cleaning The Vent And Duct
Grease builds up inside your range hood vent and duct over time. This buildup can reduce airflow and cause odors. Regular cleaning keeps the vent clear and safe.
Focus on accessing the vent carefully and using the right tools like vacuums or brushes. This helps remove grease without damaging your system.
Accessing The Vent
First, turn off the power to your range hood to stay safe. Remove the vent cover or grille by unscrewing or unclipping it. Use a flashlight to see inside clearly.
- Wear gloves to protect your hands from grease and sharp edges.
- Keep a bucket or cloth nearby to catch any falling debris.
- Check the vent for any loose parts before cleaning.
Using A Vacuum Or Brush
Use a vacuum with a narrow nozzle to suck out loose dust and grease flakes. For stuck grease, a stiff brush helps scrub the surfaces inside the duct.
| Tool | Use | Tip |
| Vacuum cleaner | Remove loose dirt and dust | Use hose attachment for tight spaces |
| Stiff brush | Scrub off stuck grease | Choose a brush with nylon bristles |
| Cloth or sponge | Wipe cleaned surfaces | Use warm soapy water for best results |

Credit: www.searshomeservices.com
Reassembling And Final Checks
After cleaning the grease from your range hood, it is important to put everything back correctly. This step ensures your range hood works well and stays clean longer.
Pay close attention to each part as you reassemble. This helps avoid damage and keeps the hood safe to use.
Reinstalling The Filters
Place the filters back into the range hood carefully. Make sure they fit snugly and lock into place if there are clips or screws.
- Check the filter frame for any bends or damage.
- Align the filter edges with the slots in the hood.
- Push the filter firmly but gently to secure it.
- Use screws or clips to lock the filters if your model has them.
- Clean your hands before handling filters to avoid adding grease.
Ensuring Proper Functionality
Once reassembled, test your range hood to make sure it works correctly. Check the fan, lights, and buttons.
| Check | What to Look For | Action if Problem |
| Fan | Runs smoothly without noise | Clean blades or call a technician |
| Lights | Turn on and off properly | Replace bulbs or check wiring |
| Buttons | Respond when pressed | Inspect switch or panel |
Maintenance Tips
Keeping your range hood clean is important for a healthy kitchen. Grease buildup can block airflow and cause odors.
Regular care helps your range hood work well and last longer. Follow these tips to clean grease safely and easily.
Regular Cleaning Schedule
Set a cleaning routine to stop grease from piling up. Clean the hood surface and filters often.
- Wipe the hood with warm, soapy water every week.
- Remove and wash grease filters every month.
- Check the fan and vent for grease every three months.
- Use a degreaser for tough spots but rinse well.
Using Grease Filters Effectively
Grease filters trap oil and stop it from reaching the fan. Clean filters keep air moving smoothly.
| Filter Type | Cleaning Method | Cleaning Frequency |
| Metal Mesh | Soak in hot soapy water, scrub gently | Monthly |
| Charcoal | Replace with new filters | Every 3 to 6 months |
| Baffle | Wash in dishwasher or by hand | Monthly |

Credit: www.realtor.com
:max_bytes(150000):strip_icc()/clean-range-hood-GettyImages-523354460-29814202737d43e983678cb5cbf7312a.jpg)
Credit: www.realsimple.com
Frequently Asked Questions
How Often Should I Clean Grease From My Range Hood?
Clean your range hood grease every one to three months. Frequent cleaning prevents buildup and ensures efficient ventilation. Adjust frequency based on cooking habits and grease accumulation.
What Household Items Remove Grease From Range Hoods?
Use baking soda, vinegar, and dish soap for effective grease removal. These natural cleaners break down grease safely and economically without harsh chemicals. They’re gentle yet powerful for routine cleaning.
Can I Use Commercial Degreasers On My Range Hood?
Yes, commercial degreasers work well but choose non-abrasive formulas. Follow product instructions carefully to avoid damaging surfaces. Always rinse thoroughly to remove residue and prevent odors.
Is It Safe To Clean Range Hood Filters In The Dishwasher?
Most metal filters are dishwasher safe and clean thoroughly. Use a gentle cycle and avoid high heat settings to protect the filter. Check manufacturer guidelines before dishwasher cleaning.
Conclusion
Cleaning grease from your range hood keeps it working well. Regular care stops grease build-up and bad smells. Use gentle cleaners and soft cloths for best results. Clean filters often to keep air fresh and clear. A clean range hood makes cooking safer and easier.
Small steps make a big difference over time. Keep your kitchen fresh and your hood grease-free. Simple cleaning habits save time and effort later. Your kitchen will feel cleaner and look better too.