
Are you tired of struggling to clean those tight spots around your appliances? Dust, crumbs, and spills can easily hide in these hard-to-reach areas, making your kitchen look messy even after a quick clean.
But what if cleaning around your fridge, stove, or dishwasher didn’t have to be a frustrating chore? In this guide, you’ll discover simple, effective tips that save you time and effort, leaving your appliances sparkling and your kitchen fresh. Keep reading, and you’ll learn how to tackle those tricky spots like a pro—no special tools or harsh chemicals needed!
Essential Cleaning Tools
Cleaning around appliances keeps your kitchen healthy and fresh. Using the right tools makes the job easier and faster.
Choosing proper cleaning supplies helps reach tight spots and removes dirt well. Let’s look at what you need.
Must-have Supplies
Gather these basic supplies to clean around appliances effectively. Each tool helps with different parts of the job.
- Microfiber cloths for dust and smudges
- A small brush for crevices and vents
- A vacuum cleaner with a narrow nozzle
- Spray bottle for water or cleaning solution
- Rubber gloves to protect your hands
Choosing The Right Products
Select cleaning products that match your appliance surfaces. Harsh chemicals can cause damage or discoloration.
| Surface Type | Recommended Product | Products to Avoid |
| Stainless Steel | Mild detergent, vinegar solution | Abrasive cleaners, bleach |
| Glass | Glass cleaner, water | Ammonia-based sprays |
| Plastic | Mild soap, warm water | Alcohol, harsh solvents |
| Rubber Seals | Gentle soap, water | Strong acids, bleach |

Credit: cleanzen.com
Safety Precautions
Cleaning around appliances needs care to avoid accidents. Safety is the top priority. Follow simple rules to protect yourself and your home.
Proper preparation helps prevent electrical shocks and damage. Always know how to safely handle appliances before cleaning.
Powering Down Appliances
Turn off appliances before cleaning to stop electricity flow. Unplugging is safest to avoid any power risks.
- Switch off the appliance using its power button.
- Unplug the appliance from the wall socket.
- Wait a few minutes to let it cool down if it was hot.
- Check that all controls are in the off position.
Handling Electrical Components
Electrical parts need careful handling to avoid shocks or damage. Use dry hands and avoid water near plugs and cords.
| Do | Don’t |
| Use a dry cloth to clean plugs | Use wet cloths near outlets |
| Inspect cords for damage before cleaning | Pull cords by the wire to unplug |
| Keep appliance cords away from water | Touch plugs or sockets with wet hands |
| Disconnect appliances before cleaning electrical parts | Attempt repairs without knowledge |
Cleaning The Refrigerator
Cleaning your refrigerator keeps food fresh and your kitchen healthy. Dirt and spills can build up inside and outside the fridge.
Regular cleaning also helps your appliance work better and last longer.
Removing Contents And Shelves
Start by turning off the refrigerator and unplugging it. Take out all food items and place them in a cooler or another fridge.
Remove shelves, drawers, and any other removable parts carefully. These parts often hold spills and crumbs.
- Empty the fridge completely.
- Take out shelves and drawers.
- Check expiration dates on food items.
- Place food in a cool place temporarily.
Wiping Interior And Exterior
Use a mild soap solution or vinegar with water to clean inside the fridge. Avoid harsh chemicals that can harm surfaces.
Wipe all surfaces, including walls, shelves, and drawers. Dry them well before putting them back.
| Area | Cleaning Tip |
| Interior Walls | Use warm soapy water or vinegar solution |
| Shelves and Drawers | Wash separately and dry completely |
| Exterior Surface | Wipe with damp cloth and dry |
| Door Seals | Clean gently with a toothbrush and mild soap |
Cleaning Coils And Drip Pan
Dust and dirt on coils can reduce fridge efficiency. The drip pan collects water and can develop mold.
Follow these tips to clean coils and drip pan:
- Unplug the refrigerator before cleaning coils.
- Use a vacuum or coil brush to remove dust from coils.
- Locate and remove the drip pan carefully.
- Wash the drip pan with warm, soapy water and dry it fully.
- Replace the drip pan and plug the fridge back in.

Credit: www.choice.com.au
Oven And Stove Care
Cleaning around your oven and stove keeps your kitchen safe and tidy. Regular care stops grease and food bits from building up.
Use simple tools and safe cleaners to protect your appliances and make cooking more pleasant.
Degreasing The Stove Top
Grease can stick to your stove top and cause stains. Clean it often to keep your stove looking new.
- Turn off the stove and let it cool.
- Remove burner grates and drip pans.
- Wipe loose crumbs with a damp cloth.
- Apply a degreaser or mix of warm water and dish soap.
- Scrub gently with a soft sponge or cloth.
- Rinse with clean water and dry with a towel.
- Replace grates and drip pans once dry.
Cleaning The Oven Interior
Ovens get dirty from spills and burnt food. Clean the inside regularly to keep it working well.
| Cleaning Step | Details |
| Remove racks | Take out racks and soak them in warm soapy water. |
| Apply oven cleaner | Use a store-bought cleaner or baking soda paste on oven walls. |
| Wait | Let the cleaner sit for 15-30 minutes. |
| Scrub | Use a sponge or cloth to scrub away grime. |
| Rinse | Wipe with a damp cloth to remove cleaner residue. |
| Dry and replace racks | Dry the inside and racks before putting racks back. |
Maintaining Knobs And Handles
Knobs and handles get greasy and dirty fast. Clean them often to keep them working smoothly.
Follow these tips for good care:
- Turn off and unplug the stove before cleaning.
- Remove knobs gently by pulling them straight out.
- Wash knobs and handles in warm, soapy water.
- Dry completely before reattaching to avoid damage.
- Use a soft brush to clean around fixed handles and edges.
- Do not soak knobs with electronic parts inside.
Dishwasher Maintenance
Keeping your dishwasher clean helps it work well. Regular care stops bad smells and blockages.
Simple maintenance steps can save you time and money. Follow these tips to keep your appliance fresh.
Cleaning The Filter
The dishwasher filter catches food and debris. It needs cleaning to avoid clogging.
- Open the dishwasher and remove the bottom rack.
- Locate the filter at the bottom center.
- Take out the filter and rinse it under warm water.
- Use a soft brush to clear stubborn particles.
- Put the filter back securely before running the dishwasher.
Checking Spray Arms
Spray arms spray water to clean dishes. Blocked holes reduce cleaning power.
| Task | How to Do It |
| Remove Spray Arms | Turn or unclip the arms carefully from the dishwasher. |
| Inspect Holes | Look for clogs caused by food or minerals. |
| Clean Holes | Use a toothpick or soft brush to clear each hole. |
| Rinse and Replace | Rinse arms with water and reattach them firmly. |
Running A Cleaning Cycle
Running a cleaning cycle removes grease and buildup inside the dishwasher.
- Empty the dishwasher completely before cleaning.
- Place dishwasher cleaner or a cup of white vinegar on the top rack.
- Run a hot water cycle without dishes.
- After the cycle ends, wipe the inside with a clean cloth.
Washing Machine And Dryer
Cleaning around your washing machine and dryer helps keep them working well. Dirt, lint, and moisture can cause problems over time.
Regular care prevents damage and keeps your laundry area fresh and safe.
Clearing The Lint Trap
The lint trap collects fibers from your clothes in the dryer. Clean it after every use to avoid fire risks and improve drying.
- Remove the lint screen from the dryer.
- Use your fingers or a soft brush to clear lint.
- Wash the screen with warm, soapy water monthly.
- Let the screen dry completely before putting it back.
Cleaning The Drum
Cleaning the drum removes dirt and detergent residue. This keeps your clothes smelling fresh and prevents stains.
- Wipe the drum with a damp cloth after each use.
- Run a cleaning cycle once a month using washing machine cleaner.
- Leave the door open after washing to let the drum dry.
Inspecting Hoses And Vents
Check hoses and vents to avoid leaks and blockages. Clean and replace parts if needed to keep machines safe.
| Item | What to Check | How Often |
| Water Hoses | Cracks or leaks | Every 6 months |
| Dryer Vent | Lint buildup and blockages | Every 3 months |
| Drain Hose | Blockages | Every 6 months |
Microwave Freshening
Microwaves get dirty quickly from food splatters and odors. Keeping your microwave fresh helps it work well and smell nice.
Cleaning your microwave often prevents buildup and keeps it safe for cooking. Use simple tools and natural cleaners to freshen it up.
Using Natural Cleaners
Natural cleaners like vinegar and lemon are safe and effective. They remove smells and stains without harsh chemicals.
Mix equal parts water and vinegar or place lemon slices in a bowl with water. Heat the bowl in the microwave until it steams.
- The steam softens food stains inside the microwave.
- The vinegar or lemon helps remove odors.
- Natural cleaners are gentle and safe to use.
Wiping Down Interior
After steaming, open the microwave and wipe the inside with a soft cloth. This removes loosened food and dirt.
Clean the door, walls, and ceiling carefully. Dry the interior with a clean towel to avoid streaks and moisture.
- Use a damp cloth to wipe all surfaces.
- Pay attention to corners and edges.
- Dry thoroughly to stop mold and smells.
Small Kitchen Appliances
Small kitchen appliances help prepare food quickly. They need regular cleaning to work well and last longer.
Cleaning around these appliances keeps your kitchen neat and safe from germs.
Cleaning The Toaster
Unplug the toaster before cleaning. Let it cool completely to avoid burns.
Remove crumbs by shaking the toaster upside down over a trash can. Use a soft brush to clean inside.
- Unplug and cool the toaster
- Shake out crumbs carefully
- Use a soft brush for hard-to-reach spots
- Wipe the outside with a damp cloth
- Dry with a clean towel before use
Descaling The Coffee Maker
Descaling removes mineral buildup inside your coffee maker. This keeps it working well and improves taste.
Fill the water reservoir with a mix of equal parts white vinegar and water. Run a brewing cycle without coffee grounds.
- Mix equal parts vinegar and water
- Pour into the water reservoir
- Run a brewing cycle without coffee
- Run two cycles with clean water to rinse
- Wipe the outside with a damp cloth

Credit: www.youtube.com
Frequently Asked Questions
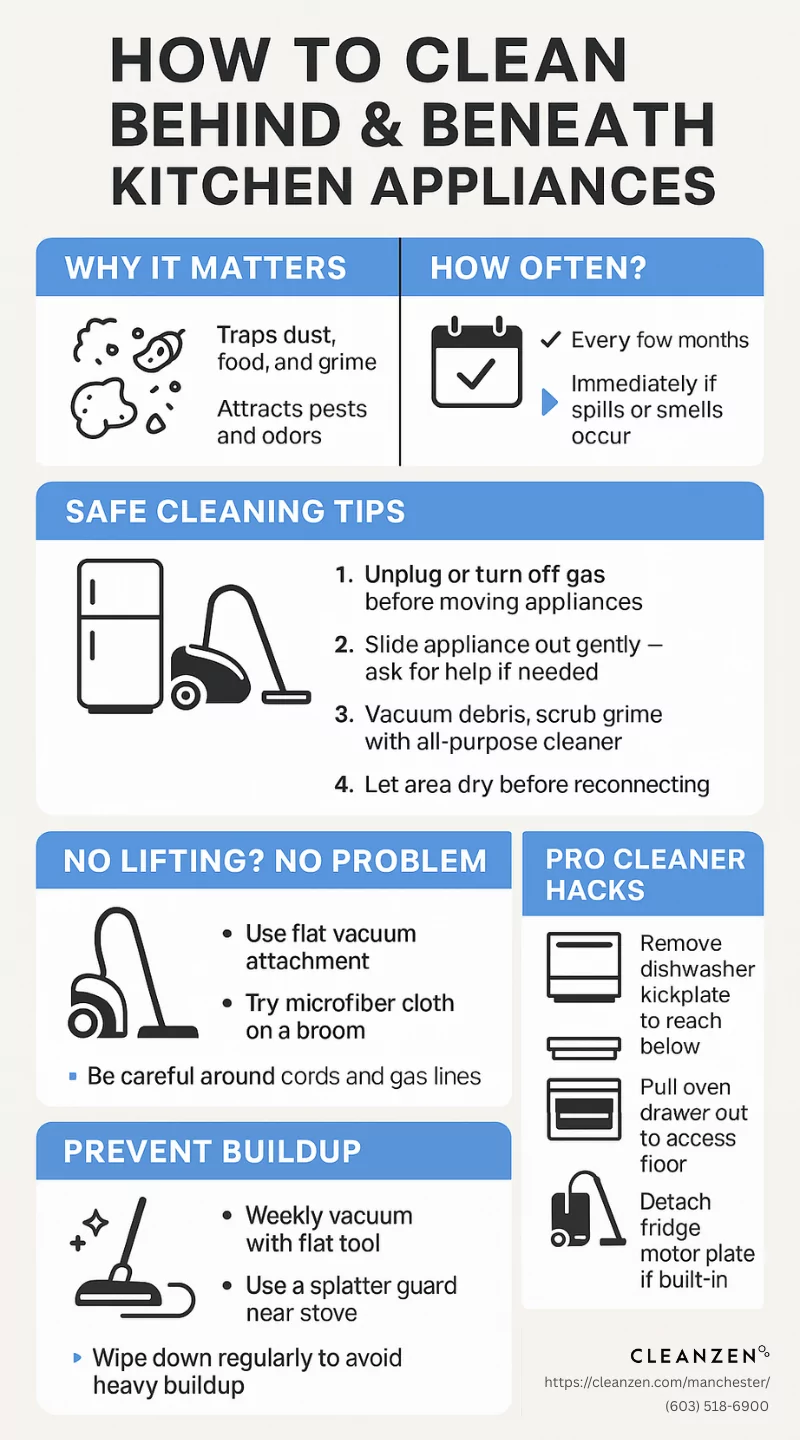
How Do I Clean Under Heavy Appliances Safely?
Unplug the appliance before cleaning. Use sliders or lifting straps to move it gently. Clean the floor and appliance base with a vacuum and damp cloth.
What Is The Best Way To Clean Behind Appliances?
Remove the appliance carefully. Dust and vacuum the area thoroughly. Use a damp cloth with mild detergent for sticky spots. Dry the area before replacing the appliance.
How Often Should I Clean Around Kitchen Appliances?
Clean around appliances monthly to prevent dust buildup. Wipe spills immediately to avoid stains and odors. Deep clean under and behind appliances every 3-6 months.
Can I Use Household Cleaners On Appliance Surfaces?
Use mild, non-abrasive cleaners suitable for appliance finishes. Avoid harsh chemicals that damage surfaces. Test cleaners on a small area first to ensure safety.
Conclusion
Cleaning around appliances keeps your kitchen fresh and safe. Dirt and dust can cause problems if left for too long. Regular cleaning stops buildup and makes your appliances work well. Use simple tools like a vacuum, cloth, and mild cleaner.
Small efforts often save big repairs later. Keep this routine easy and quick. Your home will feel cleaner and more comfortable. Start today and enjoy a tidy kitchen every day. Simple steps bring great results.