
Your kitchen sponge is one of the dirtiest items in your home, even though you use it every day. It can quickly become a breeding ground for harmful bacteria that might make you and your family sick.
But don’t worry—disinfecting your kitchen sponge is easier than you think. You’ll discover simple, effective ways to keep your sponge clean and safe. Keep reading to learn how to protect your kitchen and health with just a few easy steps.
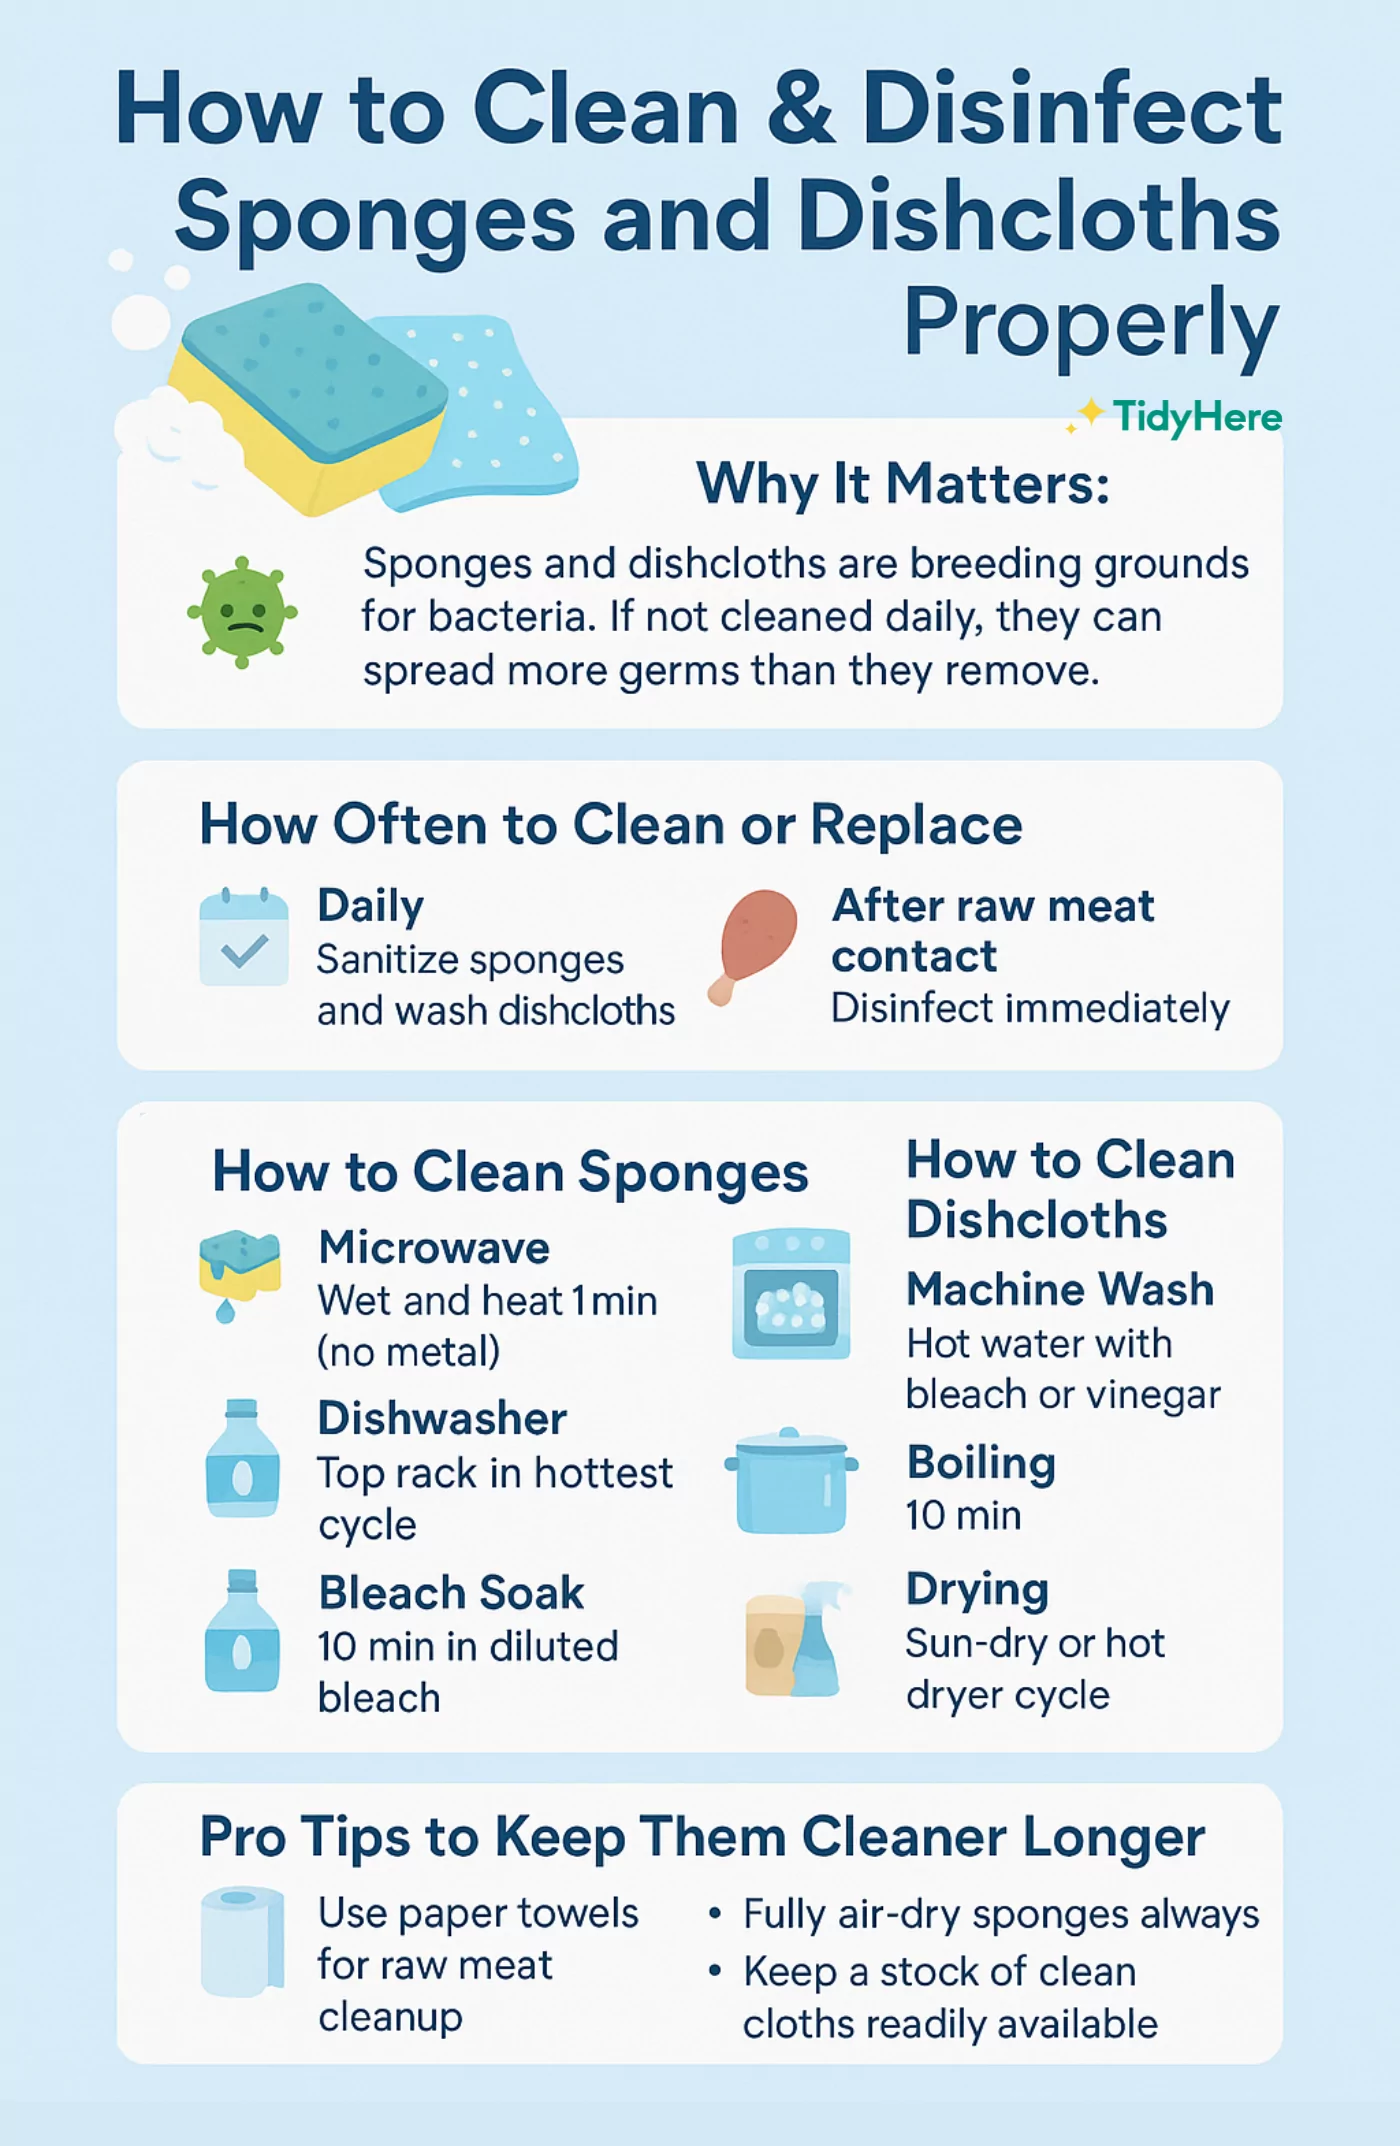
Importance Of Disinfecting Sponges
Kitchen sponges are used daily to clean dishes and surfaces. They often hold bacteria and germs.
Disinfecting sponges helps stop the spread of harmful germs in your kitchen. It keeps your home safer.
Preventing Foodborne Illnesses
Sponges can carry bacteria like salmonella and E. coli. These germs cause food poisoning.
Cleaning and disinfecting sponges reduces these bacteria. This lowers the risk of getting sick.
Reducing Bad Odors
Dirty sponges often smell bad because of bacteria growth. The smell can spread in your kitchen.
Disinfecting sponges kills odor-causing germs. This keeps your kitchen smelling fresh and clean.
Extending Sponge Life
Sponges break down faster when bacteria build up inside them. This makes them less useful.
Cleaning and disinfecting sponges helps them last longer. You save money by using them more.
Maintaining Kitchen Hygiene
A clean sponge supports overall kitchen hygiene. It stops germs from spreading to food and surfaces.
Regular sponge disinfection is a simple way to keep your kitchen safe and healthy.

Credit: tidyhere.com
Common Germs In Kitchen Sponges
Kitchen sponges are useful for cleaning, but they can hold many germs. These germs can cause illness if not cleaned properly.
Understanding the common germs in sponges helps you keep your kitchen safe and healthy.
Escherichia Coli (e. Coli)
E. coli bacteria live in the intestines of humans and animals. Some types can cause stomach problems and food poisoning.
Sponges collect E. coli from raw meat or unwashed vegetables during cleaning.
Salmonella
Salmonella bacteria often come from raw poultry and eggs. They cause food poisoning with symptoms like diarrhea and fever.
Sponges can spread salmonella if they touch contaminated food or surfaces.
Staphylococcus Aureus
Staphylococcus aureus lives on skin and in the nose. It can cause infections and food poisoning.
This germ can grow in sponges that stay wet and warm for a long time.
Listeria Monocytogenes
Listeria bacteria grow in cold and wet places. They can cause serious illness, especially in pregnant women.
Sponges can carry listeria if they clean raw meat or produce without proper disinfection.
Mold And Yeast
Mold and yeast grow in damp sponges left too long without drying. They can cause bad smells and allergic reactions.
These fungi weaken the sponge and make it less effective for cleaning.
Signs Your Sponge Needs Disinfecting
Kitchen sponges are used every day to clean dishes and surfaces. They can hold many germs if not cleaned properly.
Knowing when to disinfect your sponge helps keep your kitchen safe and hygienic.
Foul Odor Coming From The Sponge
If your sponge smells bad or sour, it means bacteria have grown inside. This is a clear sign it needs disinfecting.
Cleaning the sponge will remove the odor and reduce germs.
Visible Stains Or Discoloration
Sponges often change color when they get dirty or moldy. Look for dark spots or stains on the sponge surface.
Discoloration shows that bacteria or mold might be growing inside the sponge.
Sponge Feels Slimy Or Sticky
A slimy or sticky texture means your sponge holds leftover food and germs. This makes it unsafe to use.
Disinfecting the sponge will remove the slime and kill bacteria.
Sponges Used For More Than A Week
Even if your sponge looks clean, it can still hold many germs after one week of use.
Regular disinfecting or replacing sponges helps prevent the spread of bacteria.
Food Particles Trapped Inside
When small bits of food stay stuck in the sponge, germs grow faster. This makes the sponge dirty quickly.
Check your sponge for trapped food and clean it well to keep it safe.
Microwave Method
Kitchen sponges hold many germs and bacteria. Cleaning them often helps keep your kitchen safe.
The microwave method is a quick way to disinfect sponges using heat and steam. It kills most bacteria fast.
Step-by-step Guide
First, wet your sponge completely with water. A wet sponge will steam and disinfect better.
Place the wet sponge in the microwave. Set the microwave to high power for two minutes.
After microwaving, be careful when removing the sponge. It will be hot and may steam.
- Make sure the sponge is wet before microwaving.
- Microwave on high for about two minutes.
- Use tongs or a cloth to take the sponge out.
- Let it cool before using again.
Precautions And Safety Tips
Do not microwave dry sponges. They can catch fire and damage your microwave.
Always check the sponge for metal parts before microwaving. Metal can cause sparks and fires.
- Wet the sponge well to avoid fire risks.
- Remove any metal scrubbers attached to the sponge.
- Use microwave-safe containers if you place the sponge inside one.
- Keep children away during microwaving.
- Throw away sponges that smell bad or fall apart.
Boiling Water Technique
Kitchen sponges can carry many germs. Cleaning them well helps keep your kitchen safe. Boiling water is a simple way to disinfect sponges.
This method uses hot water to kill bacteria and other germs. It is easy and does not need special products.
How To Boil Your Sponge
First, fill a pot with water and bring it to a boil. Make sure the pot is large enough for the sponge.
Next, place the sponge carefully into the boiling water. Let it boil for about 5 minutes.
After boiling, use tongs to remove the sponge. Let it cool down before using it again.
- Fill pot with water
- Bring water to a rolling boil
- Place sponge in boiling water
- Boil for 5 minutes
- Remove and cool before use
Benefits Of Boiling
Boiling kills many types of germs on sponges. It helps reduce bad smells and keeps your sponge cleaner.
This method is safe and does not use chemicals. It saves money and is easy to do at home.
- Kills bacteria and germs
- Reduces odors
- Safe and chemical-free
- Cost-effective cleaning
- Simple and quick process
Vinegar And Baking Soda Solution
Kitchen sponges hold many germs and bacteria. Cleaning them often helps keep your kitchen safe.
Using vinegar and baking soda is a simple way to disinfect sponges. These common items kill germs effectively.
Preparing The Solution
Start by mixing vinegar and baking soda to make a cleaning solution. This mix helps break down dirt and kills bacteria.
Use white vinegar and regular baking soda for best results. The reaction creates bubbles that clean well.
- Pour 1 cup of white vinegar into a bowl
- Add 1 tablespoon of baking soda slowly
- Wait for bubbling to stop before use
Application Process
Soak the sponge in the vinegar and baking soda solution. Let it sit for at least 10 minutes to disinfect.
After soaking, rinse the sponge well with water. Squeeze out the excess liquid and let the sponge dry.
- Place sponge in the solution
- Soak for 10 to 15 minutes
- Rinse thoroughly with clean water
- Squeeze and air dry completely
Bleach Soak Method
Kitchen sponges can hold many germs and bacteria. Cleaning them well keeps your kitchen safe. The bleach soak method is a simple way to disinfect sponges.
This method uses diluted bleach to kill germs on sponges. It is quick and effective if done the right way.
Proper Bleach Dilution
Use the right amount of bleach to avoid damage and stay safe. Too much bleach can harm the sponge and skin.
Mix bleach with water in a clean container. The common safe ratio is one tablespoon of bleach per one quart of water.
- Use cold water to mix with bleach
- Measure bleach carefully
- Mix well before soaking the sponge
Soaking Instructions
Place the sponge in the bleach solution fully soaked. Let it sit to kill the germs inside.
Soak the sponge for five minutes. Do not leave it longer to protect the sponge material.
- Submerge the entire sponge in the solution
- Set a timer for five minutes
- After soaking, rinse the sponge well with clean water
- Let the sponge air dry completely before use
Credit: tidyhere.com
Dishwasher Cleaning Option
Kitchen sponges can hold many germs. Cleaning them is important to keep your kitchen safe.
Using a dishwasher is a simple way to disinfect sponges. It uses hot water and steam to kill bacteria.
Using The Dishwasher Effectively
Place the sponge on the top rack of your dishwasher. Avoid blocking water flow to the sponge.
Use the hottest wash and dry cycle available. This heat helps kill most germs and bacteria.
- Do not use detergent with the sponge
- Check that the sponge is dishwasher-safe
- Allow the sponge to dry completely after washing
Frequency Of Dishwasher Cleaning
Clean kitchen sponges in the dishwasher at least once a week. This keeps bacteria growth low.
If you use sponges daily for raw meat or other risky foods, clean them more often. Twice a week is better.
- Weekly cleaning for general kitchen use
- Twice a week if used on raw meat or heavy dirt
- Replace sponges every 2 to 4 weeks
When To Replace Your Sponge
Kitchen sponges collect germs quickly. They can spread bacteria if not replaced on time.
Knowing when to replace your sponge helps keep your kitchen clean and safe.
Visible Wear And Tear
Sponges get holes and tears from regular use. These make cleaning less effective.
Replace your sponge if it looks worn out or falls apart during cleaning.
Bad Smell
A strong, bad smell means bacteria build-up inside the sponge. This smell does not go away after rinsing.
Throw away the sponge if it smells bad even after cleaning or disinfecting.
After Using With Raw Meat
Sponges absorb juices from raw meat. These juices can carry harmful germs.
Replace your sponge right after cleaning raw meat surfaces to stop cross-contamination.
Frequent Use
Sponges used daily should be replaced every one to two weeks.
- Daily use shortens sponge life
- Replace regularly to reduce germs
- Less frequent use may last longer
After Disinfecting Without Improvement
Disinfect your sponge often to kill germs. If it still looks dirty or smells bad, replace it.
A sponge that does not improve after cleaning is not safe to use anymore.
Eco-friendly Alternatives To Sponges
Kitchen sponges can harbor germs and wear out fast. Choosing eco-friendly options helps reduce waste.
These alternatives clean well and are better for the planet. They also last longer and are easy to care for.
Reusable Cloths
Reusable cloths are a great choice instead of sponges. They can be washed many times and dry quickly.
Cloths made from cotton or bamboo are soft and strong. Use different cloths for dishes and counters to avoid cross-contamination.
- Wash cloths in hot water to kill germs
- Hang to dry after each use
- Replace cloths every few weeks or when worn
Biodegradable Sponges
Biodegradable sponges break down naturally after use. They come from plant-based materials like cellulose or loofah.
These sponges clean well and compost easily. They are a safer choice for the environment than plastic sponges.
- Made from renewable materials
- Free of harmful chemicals
- Decompose in compost bins
Maintaining A Clean Kitchen Environment
Keeping your kitchen clean helps stop germs and keeps food safe. Kitchen sponges can hold many bacteria if not cleaned well.
Disinfecting sponges regularly is important for a healthy home. It reduces the risk of spreading germs while cooking.
Daily Cleaning Habits
Rinse your kitchen sponge after each use to remove food bits. Squeeze out water to keep it dry and less germy.
Store sponges in a dry place. Avoid leaving them in the sink or wet areas for long times.
- Rinse sponge thoroughly after washing dishes
- Squeeze out all excess water
- Keep sponge in a dry spot
- Replace sponges every 1-2 weeks
Regular Disinfection Practices
Disinfect your sponge to kill germs that washing alone cannot remove. Do this at least once a week for safety.
Use simple methods like microwaving or soaking in vinegar to disinfect your sponge effectively.
- Microwave the wet sponge for 1-2 minutes to kill bacteria
- Soak the sponge in a mixture of vinegar and water for 5 minutes
- Use a bleach solution for 5 minutes, then rinse well
- Always let the sponge dry completely after disinfecting

Credit: tidyhere.com
Frequently Asked Questions
How Often Should I Disinfect Kitchen Sponges?
Disinfect kitchen sponges at least once a week. Frequent cleaning prevents bacteria buildup and odors. Replace sponges every two to four weeks for best hygiene.
What Is The Best Method To Disinfect Sponges?
Microwaving damp sponges for two minutes kills most germs effectively. Alternatively, soak them in a bleach solution or run them through a dishwasher cycle.
Can Vinegar Disinfect Kitchen Sponges Effectively?
Vinegar has mild antibacterial properties but is less effective than bleach or microwaving. Use vinegar for light cleaning, but combine with other methods for thorough disinfection.
Is It Safe To Microwave Any Kitchen Sponge?
Only microwave damp, plain sponges without metallic components. Avoid sponges with scrubbing pads or metal to prevent fire hazards or damage.
Conclusion
Keeping kitchen sponges clean helps stop germs and bad smells. Regularly disinfecting sponges protects your family’s health. Use simple methods like microwaving or soaking in bleach. Always rinse sponges well and let them dry after cleaning. Replace old sponges often to keep your kitchen safe.
Clean sponges make dishwashing easier and healthier. Small steps make a big difference in kitchen hygiene. Stay consistent and enjoy a cleaner cooking space every day.